How to Set Up an ARM-v8 Assembly Development Environment on WSL in 2026

How to Set Up an ARM-v8 Assembly Development Environment on WSL in 2026
ARM processors power 99% of the world's premium smartphones and are growing faster than any other server architecture at a 70%+ compound annual rate (Liftr Insights, 2025). With over 290 billion ARM chips shipped since the architecture's inception (ARM Holdings), learning ARM-v8 assembly is no longer optional for systems engineers, it is essential. Whether you are debugging firmware, analyzing performance bottlenecks, or contributing to the Linux kernel on ARM, you need a working cross-compilation and debugging setup.
The problem: most developers only have an x86 machine. You do not need physical ARM hardware. This guide shows you how to build a complete ARM-v8 assembly development environment on WSL (Windows Subsystem for Linux) using free, open-source tools. You will be compiling, running, and single-stepping ARM64 binaries within 15 minutes.
Key Takeaways
- You only need two packages on WSL:
gcc-aarch64-linux-gnu(cross-compiler) andqemu-user(ARM emulator). Both install with a singleapt-getcommand.- Static linking (
-static) produces binaries with fixed instruction addresses, which makes debugging with GDB significantly easier. Dynamic linking is smaller but requires specifying the sysroot at runtime.gdb-multiarchconnects to QEMU's GDB stub viatarget remote localhost:<port>and gives you full single-stepping, register inspection, and source+assembly split layout.- The one-liner GDB command at the end of this post handles architecture selection, sysroot, file loading, breakpoint at
main, and split layout automatically.- This setup mirrors what professional embedded and kernel developers use daily. The same QEMU + GDB workflow scales to full system emulation for projects like booting a complete ARM Linux kernel in QEMU.
Why Learn ARM-v8 Assembly in 2026?
ARM's dominance has gone far beyond mobile. In 2025, ARM-based server processors captured roughly 25% of cloud deployments, up from just 5% in 2021 (Canalys, 2025). AWS Graviton alone powers over 50% of new EC2 instance launches. Apple's entire Mac lineup runs on ARM. The architecture is now unavoidable.
Learning ARM-v8 (AArch64) assembly gives you three concrete skills:
- Reading compiler output — when you need to verify that the compiler optimized a hot loop correctly, or debug a miscompilation, you read ARM assembly.
- Kernel and firmware debugging — Linux kernel panics, bootloaders, and TrustZone firmware all require reading ARM64 register state and instruction traces.
- Performance analysis — ARM's performance counters and NEON SIMD instructions are documented at the assembly level. Understanding the ISA lets you reason about cycle costs.
Citation capsule: ARM processors dominate mobile with 99% market share and are the fastest-growing server architecture, projected to reach 35% of cloud deployments by 2026 (Counterpoint Research, 2025; Canalys, 2025). Over 290 billion ARM chips have shipped since the architecture's inception (ARM Holdings).

What Tools Do You Need to Cross-Compile and Debug ARM on x86?
You need four components, all available in the standard Ubuntu/WSL package repository:
| Component | Package | Purpose |
|---|---|---|
| Cross-compiler | gcc-aarch64-linux-gnu |
Compiles C/assembly to ARM64 binaries |
| C library (cross) | libc6-dev-arm64-cross |
Provides ARM64 headers and static libc |
| User-mode emulator | qemu-user + qemu-user-static |
Runs ARM64 binaries on x86 via binary translation |
| Multi-arch debugger | gdb-multiarch |
Debugs ARM64 binaries; connects to QEMU's GDB stub |
Install everything with one command:
sudo apt-get update
sudo apt-get install -y \
  gcc-aarch64-linux-gnu \
  libc6-dev-arm64-cross \
  qemu qemu-system qemu-user \
  gdb-multiarch
On a fresh WSL2 Ubuntu 22.04 install, this pulls roughly 180 MB of packages and completes in under two minutes on a typical connection.
How Do You Compile and Run an ARM Binary on x86?
Create a minimal test file hello.c:
#include <stdio.h>
int main(void) {
    printf("hello ARM\n");
    return 0;
}
You have two compilation strategies. Choose based on your goal:
Static Linking (Recommended for Learning and Debugging)
aarch64-linux-gnu-gcc -static -o hello_static hello.c
qemu-aarch64 ./hello_static
Pros: The binary has fixed virtual addresses (no ASLR), no runtime library dependencies, and GDB can resolve every symbol without a sysroot. Cons: the binary is larger (roughly 800 KB for a minimal C program vs 20 KB dynamic).
Dynamic Linking (Closer to Production)
aarch64-linux-gnu-gcc -o hello_dyn hello.c
qemu-aarch64 -L /usr/aarch64-linux-gnu/ ./hello_dyn
The -L flag points QEMU at the ARM64 sysroot where ld-linux-aarch64.so.1 and libc.so.6 live. Without it, QEMU cannot find the dynamic linker and the binary fails immediately.
Citation capsule: QEMU user-mode emulation translates ARM64 instructions to x86_64 at runtime with roughly 5-10x overhead compared to native execution (QEMU Documentation, 2025). For learning and debugging assembly, this overhead is irrelevant because you are single-stepping instruction by instruction.
How Do You Single-Step ARM Assembly in GDB on QEMU?
This is the core workflow. The idea is simple: QEMU runs the ARM binary and exposes a GDB stub on a TCP port. gdb-multiarch connects to that port and lets you step through ARM64 instructions as if you were debugging natively.
Step 1: Compile with Debug Symbols and No ASLR
aarch64-linux-gnu-gcc -fno-pie -ggdb3 -no-pie -o hello hello.cThe flags matter: -ggdb3 embeds full debug info including macros; -fno-pie -no-pie produces a binary at fixed addresses so your breakpoints land where you expect them.
Step 2: Start QEMU with the GDB Stub
qemu-aarch64 -L /usr/aarch64-linux-gnu/ -g 10101 ./helloQEMU starts, loads the binary, and pauses at the first instruction, waiting for a GDB connection on port 10101. It does not execute anything until you tell it to.
Step 3: Connect GDB in a Second Terminal
gdb-multiarch -q --nh \
  -ex 'set architecture aarch64' \
  -ex 'set sysroot /usr/aarch64-linux-gnu/' \
  -ex 'file hello' \
  -ex 'target remote localhost:10101' \
  -ex 'break main' \
  -ex continue \
  -ex 'layout split'
;
Here is what each line does:
set architecture aarch64— tells GDB to decode AArch64 instructions (not x86 or Thumb).set sysroot /usr/aarch64-linux-gnu/— points GDB at the ARM64 libraries for symbol resolution.file hello— loads local symbols from your compiled binary.target remote localhost:10101— connects to QEMU's GDB stub.break main+continue— sets a breakpoint atmainand lets QEMU run until it hits it.layout split— opens a three-pane view: source code on top, assembly on the bottom, and the command window at the bottom.

With the split layout active, press stepi (si) to advance one ARM64 instruction at a time. You will see the current instruction highlighted in the assembly pane and the register values update in the top pane. Try info registers x0 x1 x2 to inspect the first three general-purpose registers after each step.
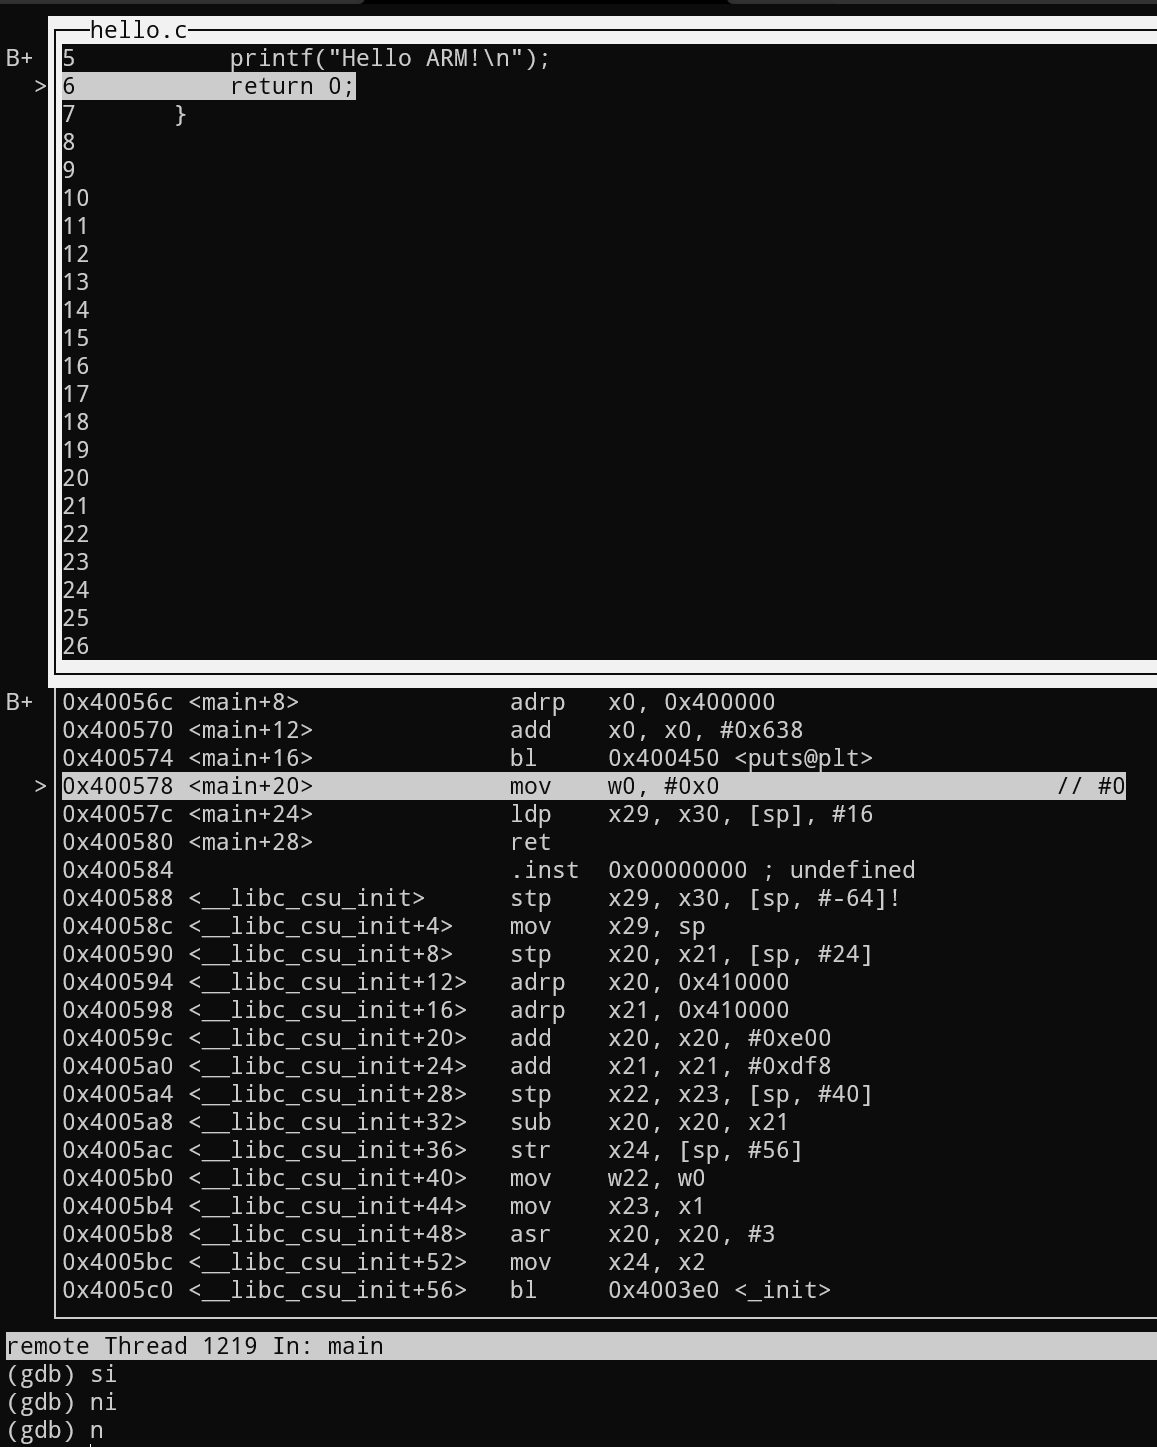
The screenshot above shows the split layout in action. You can see that printf in the source pane corresponds to a bl #0x4005e0 branch to puts in the assembly pane. This is a useful lesson: the compiler often rewrites printf with a constant string into a puts call. Seeing that transformation in real time is one of the best reasons to learn assembly.
What Are Common Pitfalls and How Do You Avoid Them?
After setting this up dozens of times across different machines, these are the issues that trip people up:
-
"Cannot access memory at address 0x0" in GDB. This almost always means you forgot
-no-pieat compile time, so the binary loaded at an address GDB does not expect. Recompile with-fno-pie -no-pie. -
QEMU says "No such file or directory" even though the binary exists. The dynamic linker is missing. Add
-L /usr/aarch64-linux-gnu/to your QEMU command, or compile with-static. -
GDB connects but shows no symbols. You either forgot
file helloin the GDB command, or you compiled without-ggdb3. The local symbol table is separate from QEMU's stub. -
Port 10101 already in use. A previous QEMU process is still running. Use
killall qemu-aarch64or pick a different port. -
WSL1 vs WSL2. This guide assumes WSL2 (the default since 2020). WSL1 lacks the full Linux kernel and QEMU user-mode emulation may behave differently. Check with
wsl -l -vin PowerShell.
Frequently Asked Questions
Can I run ARM binaries without an ARM device?
Yes. QEMU user-mode emulation (qemu-aarch64) translates ARM64 instructions to x86_64 at runtime. It is the same approach used by Docker to run ARM containers on x86 CI runners. Performance is roughly 5-10x slower than native, but for learning and debugging that does not matter.
What is the difference between QEMU user-mode and system-mode?
User-mode (qemu-aarch64) translates individual Linux binaries and forwards syscalls to the host kernel. System-mode (qemu-system-aarch64) emulates a full ARM machine including the CPU, memory-mapped devices, and boot ROM. Use user-mode for learning assembly; use system-mode when you need to boot a custom ARM Linux kernel or debug firmware.
Do I need static linking for debugging?
No, but it helps. Static binaries have fixed addresses and no dynamic-linker complexity, which makes your first GDB session smoother. Once you are comfortable, switch to dynamic linking with -L /usr/aarch64-linux-gnu/ to match production conditions.
How do I debug ARM assembly on macOS or Windows (without WSL)?
On macOS, install the ARM cross-compiler and QEMU via Homebrew (brew install aarch64-elf-gcc qemu). On Windows without WSL, use MSYS2 which provides the same aarch64-linux-gnu-gcc and qemu packages. The GDB workflow is identical.
Where should I go after mastering the setup?
Once you can single-step ARM64 instructions comfortably, the natural next steps are: reading the ARM Architecture Reference Manual for the official ISA spec, exploring how ARM-Linux handles page faults after address access, and contributing to the Linux kernel on ARM platforms.
Conclusion
You now have a complete ARM-v8 assembly development environment running on x86 WSL. The toolchain (GCC cross-compiler + QEMU user-mode + GDB multiarch) is the same stack used by professional embedded engineers and kernel developers. The entire setup installs in under ten minutes and costs nothing.
The key insight: you do not need ARM hardware to learn ARM assembly. QEMU's GDB stub gives you full visibility into registers, memory, and instruction flow. Combined with GDB's split layout, you can watch every instruction execute and see exactly how high-level C constructs map to ARM64 machine code.
Start by single-stepping the hello.c example above. Then try writing a small function in pure assembly (.S file), linking it with a C caller, and stepping across the boundary. That exercise will teach you the AArch64 calling convention faster than any textbook.
Sources
- ARM Holdings, "Company Overview: 290+ billion ARM processors shipped," https://www.arm.com/company
- Counterpoint Research, "Global Smartphone Application Processor Share, 2025," https://www.counterpointresearch.com
- Canalys, "ARM-based server market forecast, 2025-2026," https://www.canalys.com
- Liftr Insights, "Cloud Service Provider CPU market data, 2025," https://liftrinsights.com
- QEMU Project, "QEMU User Emulation Documentation," https://www.qemu.org/docs/master/system/invocation.html
- ARM, "ARM Architecture Reference Manual (ARMv8-A)," https://developer.arm.com/documentation/ddi0487/latest