Farewell to Manual OS Installation: The Complete Guide to PXE+Kickstart+Cloud-init Automation
Farewell to Manual OS Installation: The Complete Guide to PXE+Kickstart+Cloud-init Automation
Manual operating system installation on a physical server takes 30-60 minutes of attentive human work: boot from USB or virtual media, answer partitioning questions, select packages, configure networking, create users, and wait. Multiply that by hundreds of servers across multiple data centers, and the operational cost becomes staggering. Worse, manual installations are inconsistent — each technician makes slightly different choices, producing servers that look the same but behave differently.
This guide walks through building a fully automated OS installation pipeline using three protocols that have been stable for decades: PXE (Preboot Execution Environment) for network booting, Kickstart for unattended Linux installation, and Cloud-init for post-install configuration and integration. Together, they reduce OS installation from 30-60 minutes of human attention to 5-15 minutes of unattended, hands-off provisioning. The server powers on, boots from the network, installs the OS, configures itself, and joins the automation stack — without a human touching a keyboard.
Key Takeaways
- PXE enables network booting without local media: the server's NIC firmware broadcasts a DHCP request, receives a boot file via TFTP, and executes it — all without a disk or installed OS.
- Kickstart automates Linux installation with an answer file: partitioning, package selection, network configuration, and post-install scripts are predefined.
- Cloud-init handles post-install configuration: user creation, SSH keys, package installation, and integration with configuration management tools.
- Together they enable fully unattended bare metal provisioning: power on → network boot → OS install → self-configuration → ready for workload.
- Multi-site PXE requires DHCP relay and image caching: PXE does not cross subnets by design, so each site needs local infrastructure.
How Does PXE Boot Work?
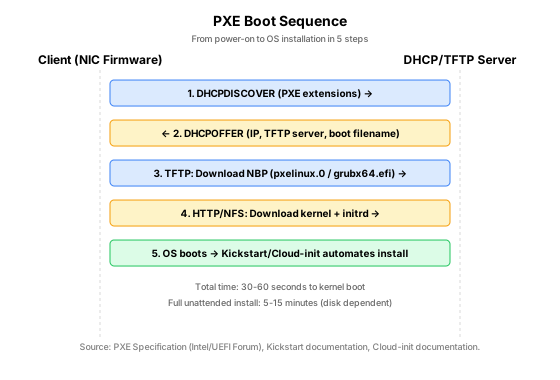
PXE (Preboot Execution Environment) enables a server to boot from the network rather than from a local disk or USB drive. The process relies on three protocols working together: DHCP for address assignment and boot server discovery, TFTP for downloading the initial boot program, and HTTP/NFS for the larger OS kernel and initrd.
The sequence begins when the server's NIC firmware broadcasts a DHCPDISCOVER packet with PXE-specific extensions on port 67/UDP. A PXE-enabled DHCP server responds with a DHCPOFFER containing the client's IP address, the TFTP server address (next-server), and the name of the Network Bootstrap Program (NBP) to download. The client configures its IP settings, then downloads the NBP into RAM via TFTP, verifies it (via UEFI Secure Boot if enabled), and executes it.
The NBP is typically just the first stage — it fetches a boot menu (PXELINUX for BIOS, GRUB for UEFI) that presents OS options. After the user selects an option (or a default times out), the NBP downloads the OS kernel and initrd via HTTP, CIFS, or NFS — protocols with higher throughput than TFTP. The kernel boots, mounts the initrd, and the OS installation begins. At this point, Kickstart takes over to automate the installation.
For UEFI systems (which represent the vast majority of modern servers), the process is similar but uses .efi executables instead of the older BIOS-based PXE. UEFI PXE is specified in the UEFI 2.4A+ specification and supports Secure Boot, which verifies the cryptographic signature of each boot component before execution.
Setting Up a PXE Server
A PXE server requires three components: a DHCP server (to assign addresses and advertise boot information), a TFTP server (to serve the Network Bootstrap Program), and an HTTP or NFS server (to serve the OS kernel, initrd, and installation files).
The DHCP server configuration is the most critical piece. It must be PXE-aware: standard DHCP assigns IP addresses, but PXE DHCP must also provide the next-server option (TFTP server IP) and the boot-file option (NBP filename). The configuration differs for BIOS vs UEFI clients.
Here is a minimal dnsmasq configuration that serves both BIOS and UEFI clients:
# /etc/dnsmasq.d/pxe.conf
# DHCP range and options
dhcp-range=192.168.1.100,192.168.1.200,255.255.255.0,1h
dhcp-option=option-router,192.168.1.1
dhcp-option=option-dns-server,192.168.1.1

# Enable TFTP
enable-tftp
tftp-root=/var/lib/tftpboot

# BIOS clients: load pxelinux.0
dhcp-boot=tag:pxe,pxelinux.0,pxeserver,192.168.1.10

# UEFI clients: load grubx64.efi
dhcp-boot:tag:uefi,grubx64.efi,pxeserver,192.168.1.10

# Tag clients by architecture (PXE client class)
dhcp-match=set:pxe,option:client-arch,0
dhcp-match=set:uefi,option:client-arch,7
dhcp-match=set:uefi,option:client-arch,9
The TFTP root directory needs the boot files: pxelinux.0 (BIOS) or grubx64.efi (UEFI), along with the boot menu configuration and any required modules. The HTTP or NFS server hosts the OS installation tree (the full contents of the OS ISO, extracted).
For production environments, consider iPXE — an open-source PXE implementation that extends the basic protocol with features HTTP booting (faster than TFTP), scriptability, and support for booting from iSCSI, FCoE, and AoE. iPXE can chainload from standard PXE: the firmware loads iPXE via TFTP, and iPXE then takes over with its enhanced capabilities.
Automating Linux Installation with Kickstart
Kickstart is Red Hat's mechanism for automating Linux installation. It is supported by RHEL, CentOS, Fedora, and their derivatives. The Kickstart file is an answer file that specifies every installation choice: disk partitioning, package selection, network configuration, user creation, and post-install scripts.
A Kickstart file is a plain text file with a specific syntax. Here is a minimal but complete example for RHEL 9:
# /var/www/html/ks/rhel9-base.cfg
# Installation method
url --url="http://192.168.1.10/os/rhel9/"
lang en_US.UTF-8
keyboard us
timezone UTC --utc

# Network configuration
network --bootproto=dhcp --device=link --activate
network --hostname=rhel9-base.local

# Security
rootpw --iscrypted$6$rounds=10000$hashedpasswordhere
firewall --enabled --ssh
selinux --enforcing
authselect --enableshadow --passalgo=sha512

# Disk partitioning
clearpart --all --initlabel
autopart --type=lvm --fstype=xfs

# Package selection
%packages
@^minimal-environment
wget
curl
python3
-cloud-init
%end

# Post-install scripts
%post --log=/root/ks-post.log
# Install cloud-init for further configuration
dnf install -y cloud-init

# Enable and start cloud-init
systemctl enable cloud-init

# Create admin user with SSH key
useradd -m -G wheels admin
mkdir -p /home/admin/.ssh
echo "ssh-rsa AAAA...your-key... admin@ops" > /home/admin/.ssh/authorized_keys
chmod 700 /home/admin/.ssh
chmod 600 /home/admin/.ssh/authorized_keys
chown -R admin:admin /home/admin/.ssh

# Disable root SSH login
sed -i 's/#PermitRootLogin yes/PermitRootLogin no/' /etc/ssh/sshd_config
%end

# Reboot after installation
reboot
The Kickstart file is referenced from the PXE boot menu. When the client boots, the kernel command line specifies the Kickstart URL:
linux vmlinuz ip=dhcp inst.ks=http://192.168.1.10/ks/rhel9-base.cfg
initrd initrd.img
For Ubuntu/Debian systems, the equivalent is Preseed — a similar mechanism with different syntax. Ubuntu Autoinstall (introduced in 20.04) uses a YAML-based configuration that is more modern and easier to maintain than traditional Preseed files.
Integrating Cloud-init for Post-Install Configuration
Cloud-init is the de facto standard for cloud instance initialization, but it works equally well on bare metal. While Kickstart handles the OS installation itself, Cloud-init handles what comes after: user creation, SSH key injection, package installation, file writing, and integration with configuration management tools.
The division of labor is straightforward: Kickstart installs the OS and installs/enables Cloud-init. On the first boot after installation, Cloud-init runs and applies the user-data configuration. This two-phase approach separates "install the OS" from "configure the machine for its role."
Cloud-init accepts configuration via the user-data file (YAML format) and optional meta-data (instance-specific variables). For bare metal, the user-data can be served from the installation server, from a CMDB API, or from the provisioning engine.
Here is a Cloud-init user-data example that configures a server for its role:
# /var/www/html/cloud-config/web-server.yml
#cloud-config
hostname: ${hostname}
fqdn: ${hostname}.example.com
manage_etc_hosts: true

users:
  - name: admin
    groups: [wheel, sudo]
    shell: /bin/bash
    sudo: ALL=(ALL) NOPASSWD:ALL
    ssh_authorized_keys:
      - ssh-rsa AAAA...your-key... admin@ops

package_update: true
package_upgrade: true

packages:
  - nginx
  - python3
  - htop

write_files:
  - path: /etc/motd
    content: |
      Server: ${hostname}
      Role: web-server
      Provisioned: $(date)
    owner: root:root
    permissions: '0644'

runcmd:
  - systemctl enable --now nginx
  - systemctl enable --now cloud-init-local
  - echo "Provisioning complete" > /tmp/provisioned

final_message: "Server ${hostname} is ready after $UPTIME seconds"
Cloud-init runs in stages: init (network and datasource detection), config (module execution), and final (post-boot scripts). For bare metal, the NoCloud datasource is most relevant — it reads configuration from a local disk (a small ISO or FAT partition seeded by the provisioning engine) or from a URL specified on the kernel command line.
The integration with the broader automation stack happens in the runcmd or bootcmd sections: register with the CMDB, enroll in Puppet/Salt, join the Kubernetes cluster, or trigger monitoring agent installation.
Multi-Site PXE: DHCP Relay and Image Caching
PXE does not cross subnets by design — the DHCP discovery phase relies on broadcast traffic that routers do not forward. For organizations with multiple availability zones or remote sites, this means each site needs local PXE infrastructure.
The standard solution is DHCP relay (also called IP helper). A relay agent on each subnet listens for DHCP broadcasts and forwards them as unicast to the central DHCP server. The DHCP server responds, and the relay agent delivers the response to the client. This allows a central DHCP server to serve multiple subnets without modification.
Here is a typical DHCP relay configuration on a Linux router:
# Install DHCP relay
apt install isc-dhcp-relay

# /etc/default/isc-dhcp-relay
SERVERS="192.168.1.10"
INTERFACES="eth0 eth1"
OPTIONS=""

# Or using dhrelay command
dhrelay -d 192.168.1.10 -i eth1
For the TFTP and HTTP components, each site needs either a local server or a caching proxy. The boot files (NBP, boot menu, kernel, initrd) are small (typically 50-200 MB total) and can be served from a local TFTP server synchronized from the central repository. The OS installation tree (several GB) benefits from a caching HTTP proxy (like Squid) that fetches packages on demand and caches them locally for subsequent installations.
iPXE chainloading provides an elegant solution for multi-site environments: the firmware loads a minimal iPXE binary via one TFTP request, and iPXE then chainloads the full configuration from an HTTP server. This reduces the TFTP server to serving only the initial iPXE binary, while the heavier HTTP traffic can be cached locally.
For bandwidth-constrained WAN links, consider a staged approach: pre-stage the OS installation tree on a local server during off-peak hours, then serve installations from local storage during business hours. This eliminates WAN transfer during the actual provisioning event.
Troubleshooting Common PXE Failures
PXE boot failures are among the most frustrating infrastructure issues because they occur before the OS loads — there are no logs, no shell, and often no clear error message. The following patterns account for the majority of PXE failures in practice.
DHCP issues (most common symptom: client gets no IP address). The client broadcasts DHCPDISCOVER but receives no response. Causes: DHCP server not running, DHCP relay not configured, client on wrong VLAN, or DHCP scope exhausted. Diagnosis: run tcpdump on the DHCP server to verify DISCOVER packets arrive. Fix: verify DHCP relay configuration, check VLAN membership, expand the DHCP scope.
TFTP timeout (symptom: client gets IP but fails to download NBP). The client receives DHCPOFFER with next-server and filename, but the TFTP transfer times out. Causes: TFTP server not running, firewall blocking UDP port 69, incorrect filename in DHCP configuration, or TFTP root directory permissions. Diagnosis: test TFTP manually with a client (tftp 192.168.1.10 -c get pxelinux.0). Fix: verify TFTP service status, check firewall rules, confirm file exists in TFTP root.
Kernel panic after boot (symptom: kernel loads then crashes). The NBP successfully downloads and boots the kernel, but the kernel panics — usually with a "VFS: Unable to mount root fs" error. Causes: initrd missing required drivers (NIC, storage controller), incorrect kernel command line parameters, or corrupted initrd. Diagnosis: check the kernel command line for correct initrd= and inst.ks= paths. Fix: regenerate initrd with required drivers, verify file integrity.
Kickstart fetch failure (symptom: kernel boots but installation does not start). The kernel boots but cannot retrieve the Kickstart file. Causes: HTTP server not running, incorrect Kickstart URL in kernel command line, or network configuration failure in the installer environment. Diagnosis: verify HTTP server accessibility from the client subnet, check the URL in the PXE boot menu. Fix: verify HTTP service, test URL with curl, ensure ip=dhcp is on the kernel command line.
Frequently Asked Questions
What are the differences between UEFI and BIOS PXE?
UEFI PXE uses .efi executable files (like grubx64.efi or bootx64.efi) instead of the older BIOS-based Network Bootstrap Program. UEFI supports Secure Boot, which cryptographically verifies each boot component before execution. UEFI PXE also uses DHCP option 93 to identify the client architecture, allowing the server to serve the correct boot file. For modern servers (2015+), UEFI is the standard — BIOS/CSM mode is deprecated. Configure your PXE server to serve both BIOS and UEFI boot files to support legacy hardware during transition.
Can I use PXE with Windows?
Yes. Windows Deployment Services (WDS) is Microsoft's PXE-based deployment solution. WDS uses the same PXE protocol for initial boot, then serves Windows Imaging Format (WIM) files for installation. The Microsoft Deployment Toolkit (MDT) adds automation capabilities similar to Kickstart: task sequences define the installation steps, and CustomSettings.ini provides the answer file. For Windows bare metal, WDS + MDT is the standard approach. The PXE server configuration is similar: DHCP provides the boot server address, TFTP serves the Windows Boot Manager, and the installation files are served via SMB or HTTP.
How do I handle different hardware profiles?
Create multiple Kickstart files (or Cloud-init user-data files) for different hardware profiles: web server, database server, compute node, storage node. The PXE boot menu presents these options, and the provisioning engine can auto-select based on hardware attributes discovered during the check-in workflow (see the CMDB-driven discovery post). For heterogeneous environments, use a "base + role" pattern: a common Kickstart file installs the OS and Cloud-init, then Cloud-init applies role-specific configuration based on the server's assigned role in the CMDB.
What about diskless booting?
PXE supports diskless booting: the server boots the kernel and root filesystem entirely from the network, with no local disk required. The root filesystem is served via NFS (for a full rootfs) or NBD/NFS with a ramdisk. Diskless booting is common in HPC clusters (thousands of compute nodes sharing a single rootfs image) and VDI environments. The PXE configuration is identical; the difference is in the kernel command line, which specifies root=/dev/nfs nfsserver=192.168.1.10:/nfs/root instead of a local disk. The trade-off is network dependency: if the NFS server fails, all diskless nodes fail.
How do I secure PXE booting?
PXE has no built-in authentication — any device on the network can request a boot file. Security measures: network segmentation (isolate the management/PXE network), 802.1X port authentication (only authenticated devices can access the PXE VLAN), UEFI Secure Boot (only signed boot components execute), and iPXE with HTTPS (encrypted boot file transfer). For classified environments, consider disabling PXE entirely and using signed USB media for initial provisioning, then switching to network-based management after the OS is installed.
Conclusion
PXE, Kickstart, and Cloud-init form a proven, stable foundation for automated bare metal OS installation. PXE handles the network boot, Kickstart automates the OS installation, and Cloud-init manages post-install configuration. Together they transform a 30-60 minute manual process into a 5-15 minute unattended one.
The architecture is straightforward: a PXE server (DHCP + TFTP + HTTP) at each site, Kickstart files for OS installation automation, Cloud-init for role-based configuration, and DHCP relay for multi-site environments. This is the same foundation that MAAS, Tinkerbell, and Ironic build upon — understanding it gives you the knowledge to evaluate, deploy, and troubleshoot any bare metal provisioning engine.
For the broader context of how this fits into the full automation stack — from CMDB as Source of Truth to provisioning engines to developer self-service — see the series overview post and the orchestration engine comparison.
Sources
- Intel/UEFI Forum, PXE Specification, https://uefi.org
- Red Hat, Kickstart Documentation, https://access.redhat.com/documentation/en-us/red_hat_enterprise_linux/9/html/performing_an_advanced_rhel_9_installation/index.html
- Canonical, Ubuntu Autoinstall Documentation, https://ubuntu.com/server/docs/install/autoinstall
- Cloud-init Documentation, https://cloudinit.readthedocs.io
- iPXE Project, https://ipxe.org
- Microsoft, Windows Deployment Services Documentation, https://learn.microsoft.com/en-us/windows-server/deployment/wds-deployment-server
- Microsoft, Microsoft Deployment Toolkit, https://learn.microsoft.com/en-us/windows/deployment/deploy-windows-mdt/